Sony 200–600mm Lens: User Guide for Wildlife Photographers
Simon is co-founder of the Marine Megafauna Foundation, an award-winning wildlife photographer, Sony Digital Imaging Advocate, and Photographer in Residence on trips to Arctic and Antarctica. This site is reader supported, we earn affiliate commissions when you buy through us.
I've been using the Sony 100–400 mm GM lens on a Sony A7R III camera as my primary wildlife photography setup since June 2018. I've taken over 40,000 photos using this combination so far.
The 100–400 mm is a genuinely fantastic lens. There are often occasions, though, where some extra reach would be nice. I spent last July in the Arctic as the "photographer-in-residence" for G Expeditions. Of my 55 favorite wildlife photos from that month, 33 (60%) were taken with the lens fully extended to 400 mm. While the 42 MP sensor on the A7R III allows for plenty of cropping, there’s no substitute for “more lens” when I want to create big prints.
Enter the Sony 200–600 lens
With that in mind, I’ve been interested in the new Sony 200–600 mm G lens as a potential addition to my system. While we were planning a visit to Kruger National Park in South Africa in December, I noticed that A Lens for Hire in Johannesburg had the 200–600 mm available, at a price of ~US$350, for our 15-day trip. Winner!
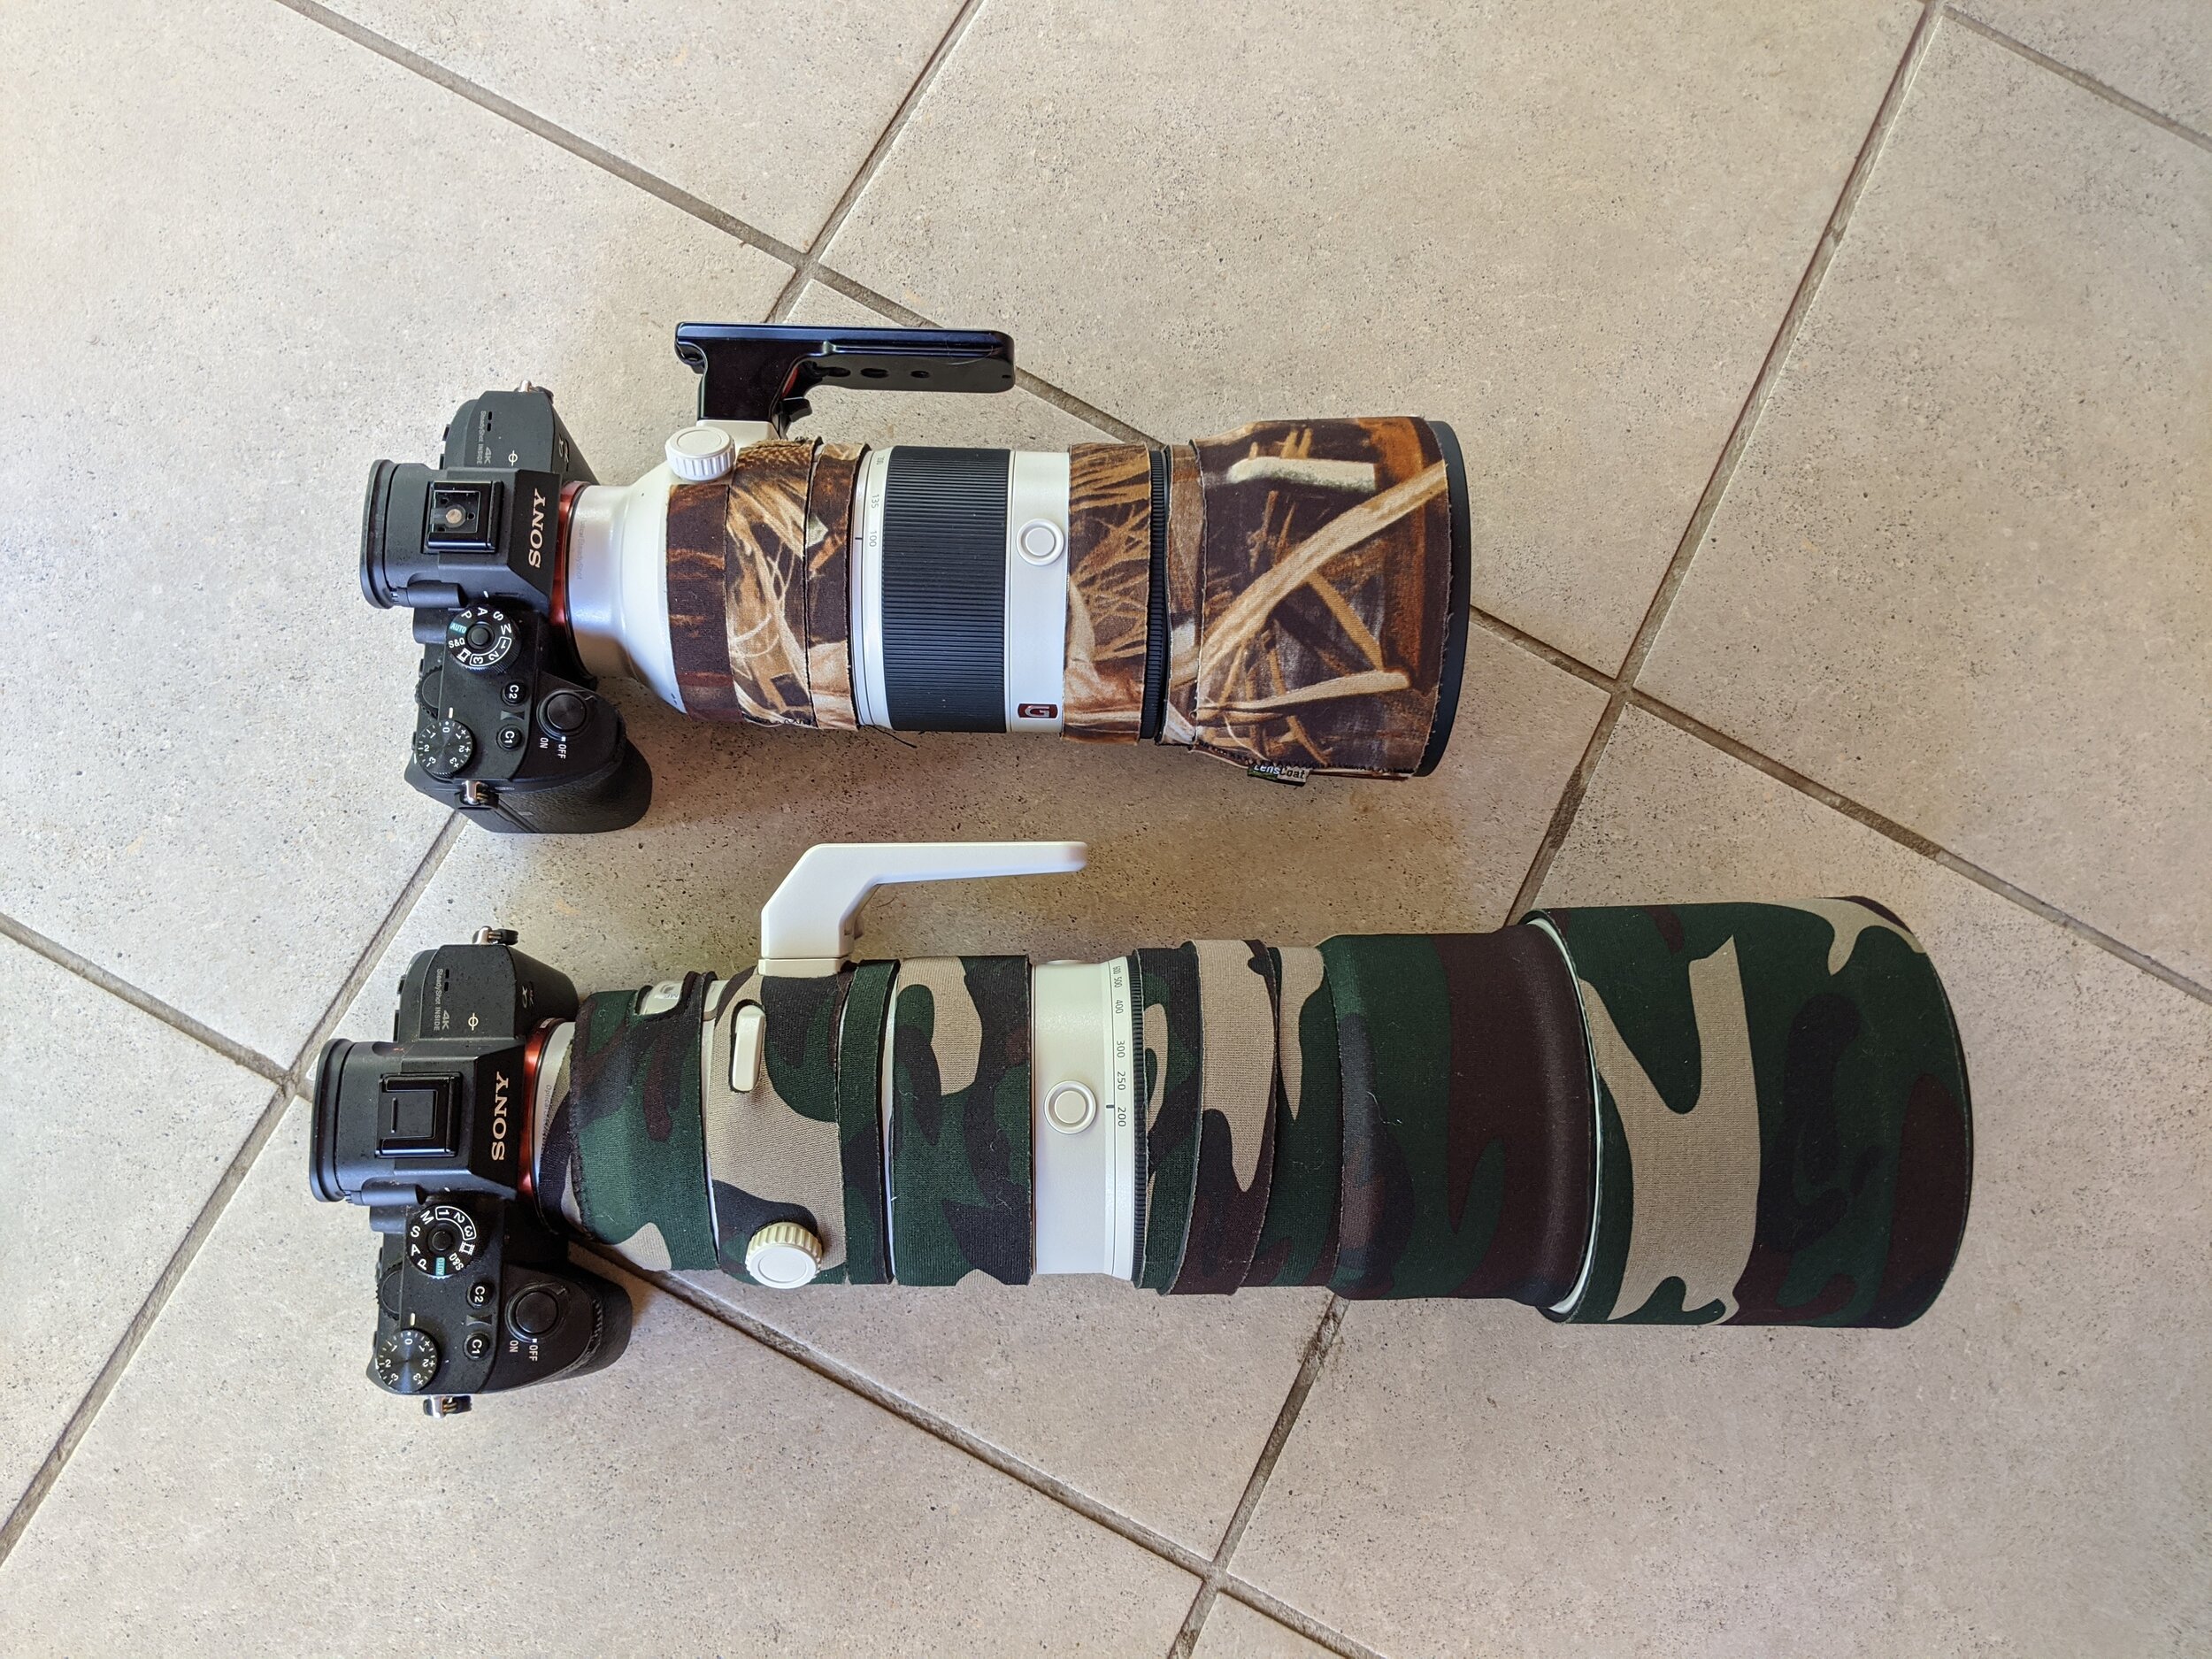
I took well over 8,000 photos with the 200–600 mm over our two weeks in Kruger. Madeleine was using our other A7R III camera body with the 100–400 mm, so it was easy to compare the two lenses in use. This is very much a practical review, though – I wasn’t trying to identify which of the two lenses is infinitesimally sharper, or has 0.001 sec faster autofocus. I just wanted to know whether it would be a useful addition to my camera bag.
First impressions
It’s a big lens. The 200–600 mm is significantly larger and heavier (2,115 g) than the 100–400 mm (1,395 g). In practical terms, I can easily hand-hold the 100–400 mm for long periods, while the 200–600 mm is much more of a workout. However, you’re not allowed to walk around in Kruger except in small, defined areas anyway. I was usually taking photos from our rental car, where I could rest the lens on the windowsill, or from bird hides that also had window ledges.
To put the 200–600 mm in context, the lens is far smaller than the 400 mm f/2.8 or 600 mm f/4 lens that many wildlife photographers choose to lug around. It’s still big enough to dominate my camera bag though.
Useful features of the 200-600 for wildlife photography
The “killer feature” of this lens is that the barrel doesn’t extend, or rotate, as you zoom in or out. This is great. It makes zooming quick – extremely useful when you need to zoom out to locate a subject in the viewfinder. You can zoom from 200 to 600 mm with only a 90º change in hand position on the zoom ring. In contrast, it takes a 180º twist for full zoom in the 100–400 mm. You need to change hand position for that as well and, as the lens extends, the weight distribution changes too. The 200–600 mm feels much faster to use.
The lens hood that comes with the 200-600 mm is big, and does its job – reducing lens flare, protecting the front element from knocks, and acting as a barrier to dust or rain – with no fuss. The included tripod foot on the lens is big enough to serve as a useful handle when you’re carrying it around attached to the camera, but the design requires a separate screw-on mount for attachment to a tripod or monopod. I’ve added an Arca-Swiss replacement foot like the Really Right Stuff model I use with my 100–400 mm.
The lens includes a “Focus Hold” button, which is programmable. I’ve set this as my “ohshit” button, an instant override using the “Recall Custom hold” function. The idea is that if I’m doing something weird, like trying to shoot a hippo in a river with a slow shutter speed to blur the water movement (as seen in the below photo), but then a pride of lions suddenly bursts out to attack said hippo (I live in hope; sorry hippo), I can immediately switch the camera to “fast action” mode by pressing and holding that
lens button.
For reference, I programmed the Focus Hold button to switch the camera over to 1/1600 sec shutter speed, f/8 aperture and Auto ISO to freeze motion, with continuous autofocus, Lock-On AF: Wide, and AF-ON so that it would have immediately tracked the lions as they brutally but majestically combined to take down the hippo in a multiple award-winning photo sequence (again, sorry hippo). It’s nice to have a “panic button” like that when you’re shooting unpredictable wildlife.
How’s the autofocus on the 200-600?
The 200–600 mm combines well with the Sony A7R III for fast autofocus. I suspect the 100–400 mm is ever-so-slightly better with lock-on AF (i.e. continuous tracking) than the 200–600 mm, but not in a particularly noticeable way – it’s just a feeling. I wasn’t shooting many birds in flight on this trip, which is always a good test for autofocus systems, but the lens had few problems keeping up with hyenas jogging towards us in low light.
In practical terms, it’s best not to be completely reliant on the A7R III’s lock-on autofocus anyway. The tracking capabilities of the camera are impressive in good light, but it struggles with low-contrast subjects. I normally shoot with Lock-On AF: Expand Flexible Spot (which I find to be the most predictable and reliable tracking mode for my shooting style) programmed to my AF-ON button. That’s my preferred option, but my AEL button is customized with an override to Flexible Spot: Small (also using Recall Custom hold). That way, if tracking is proving fickle, I can immediately switch my thumb over to the AEL button and manually place the focus point exactly where I want it.
A neat feature on some mirrorless cameras, and particularly the newer Sony lineup, is the addition of Eye AF – the camera will look for, and focus on, the closest eye in the scene. This works great for people. Animal Eye AF also became available in a firmware upgrade for the A7R III last year. It’s been developed to work well for domestic dogs and cats, so I thought I’d try it with their larger relatives, such as lions. I did some opportunistic testing during this trip. It’s very cool… sometimes. As soon as a lion turns its head, for instance, the autofocus completely loses the plot. Animal Eye AF also struggles to consistently identify eyes – it will lock-on to ears and random leaves, and it’s quite hard to refocus if it has misidentified the subject. It was fun to try with the 200–600 mm, but I don’t think it’s ready for use in serious wildlife photography at this stage.
Is it a sharp lens?
Yes. It’s certainly sharp enough for me. I don’t anticipate any issues with publishing (good) photos taken with this lens.
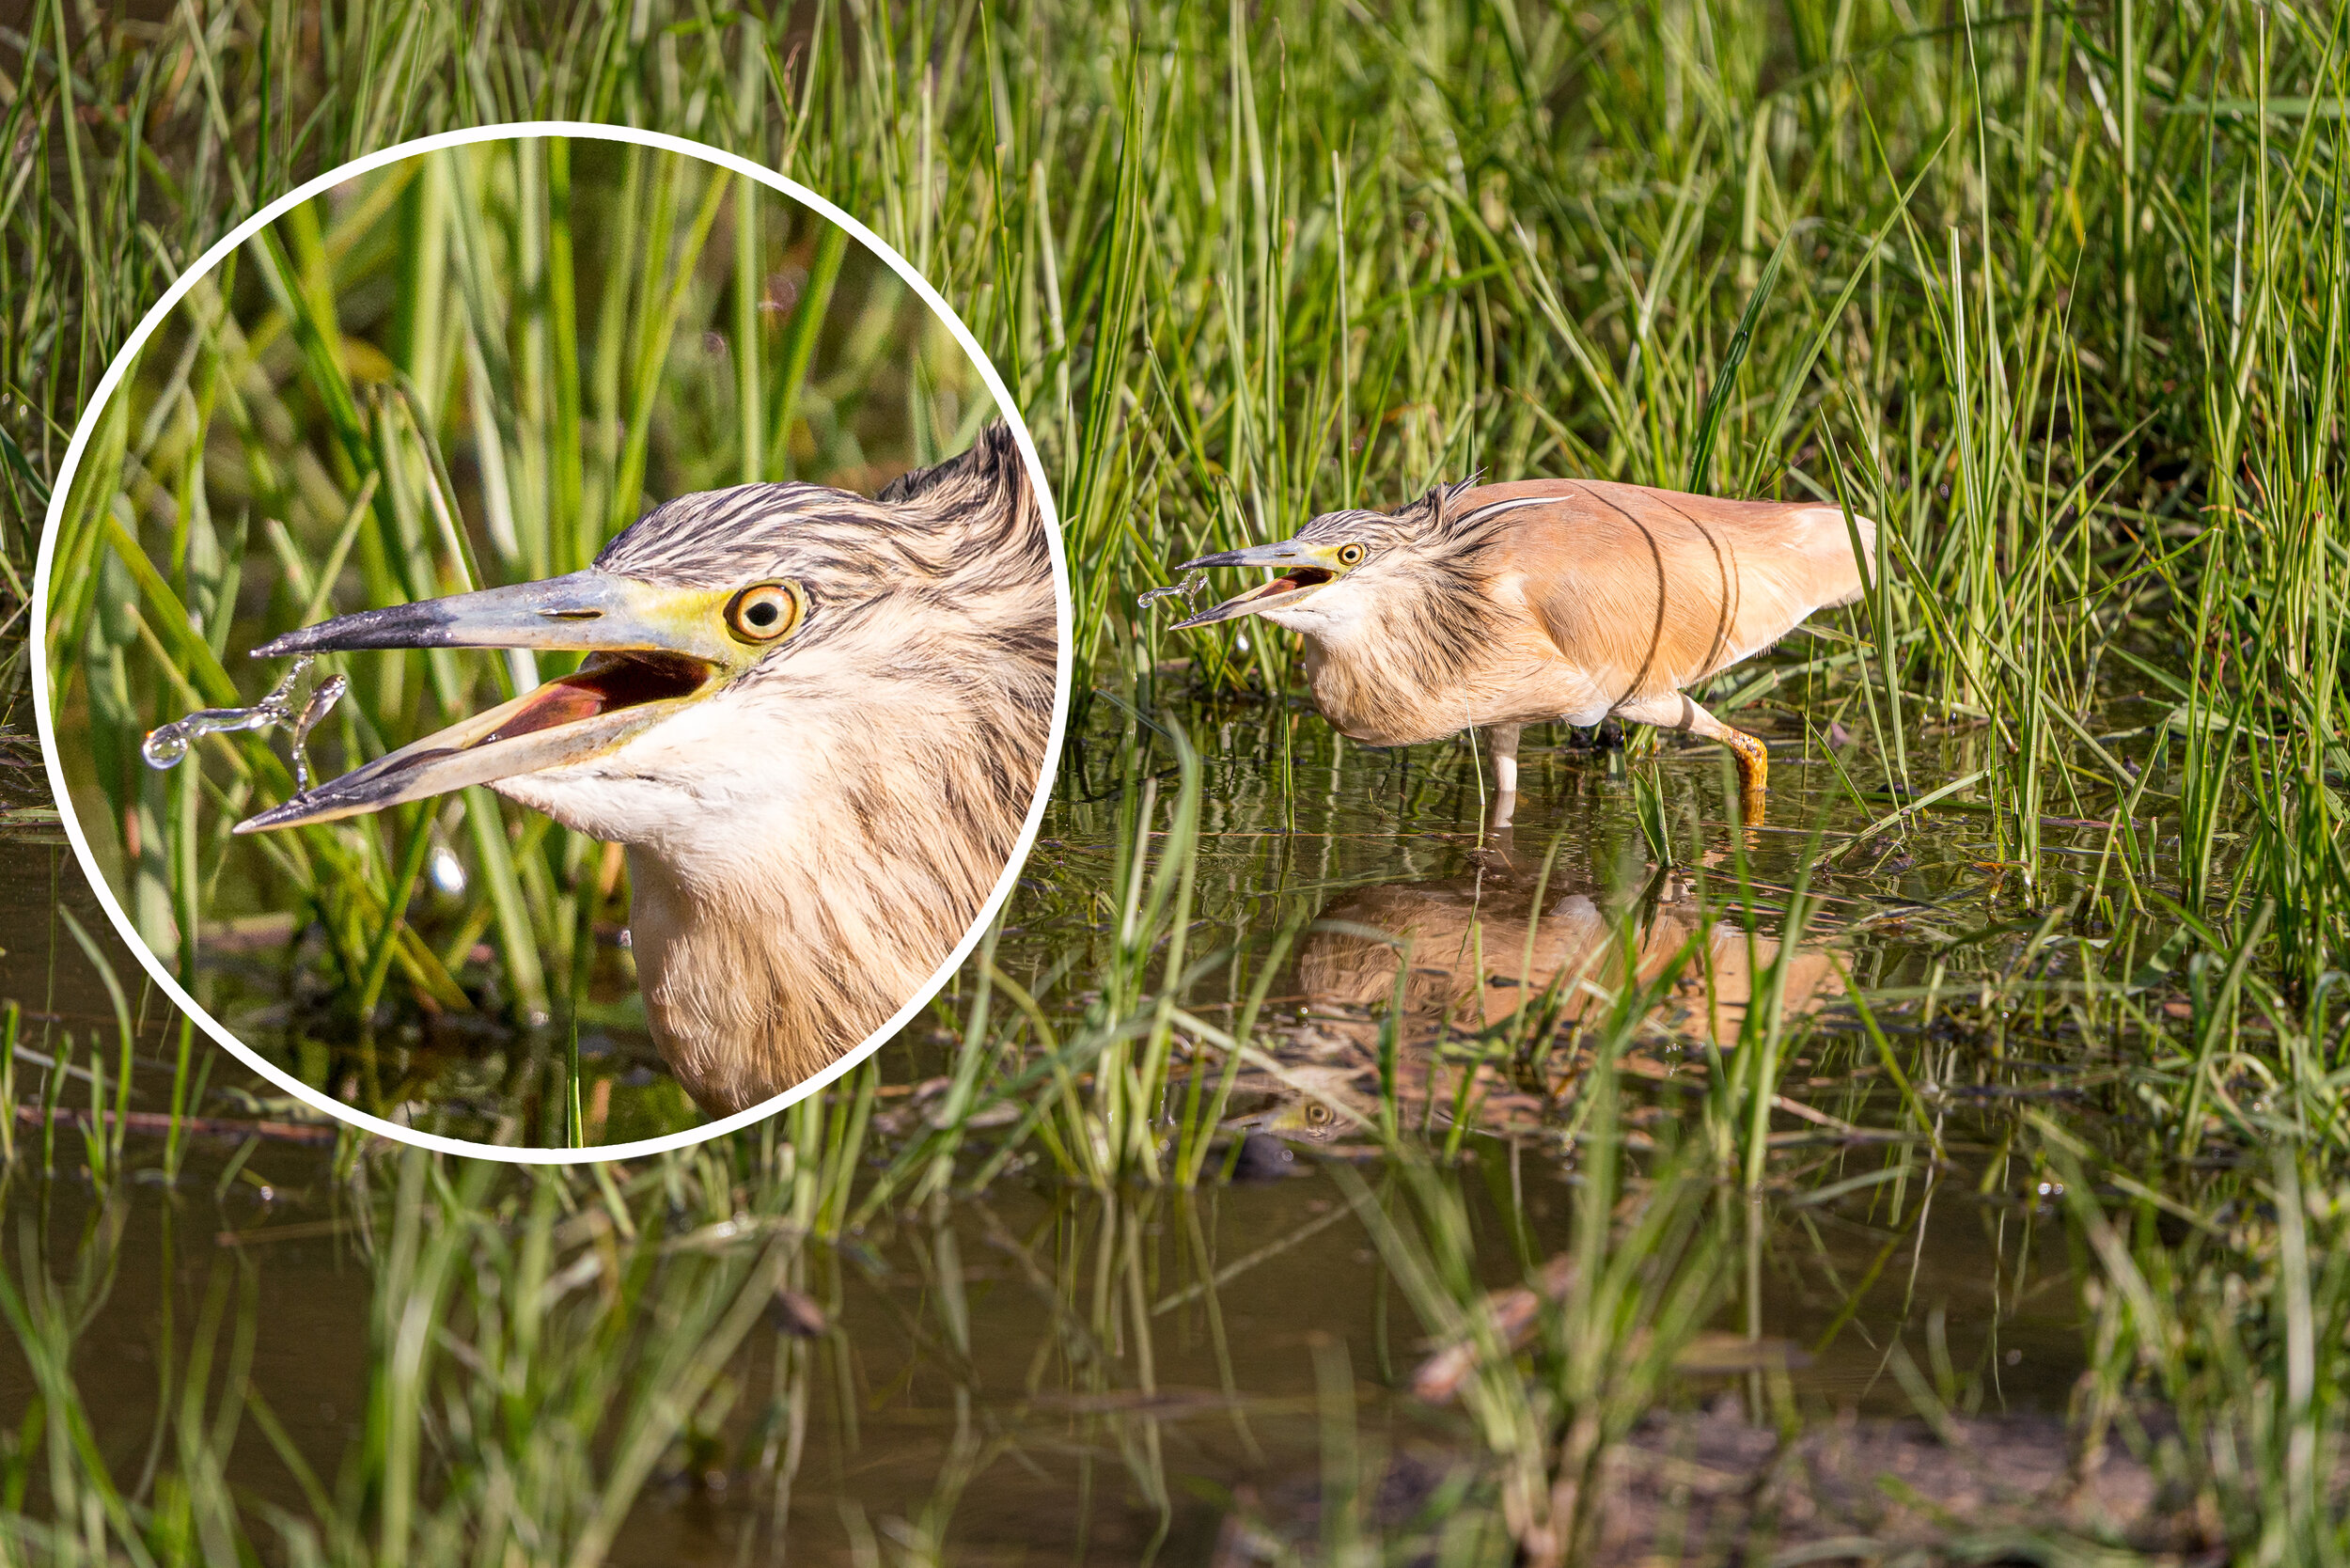
Squacco heron catching a fish photographed using the 200-600mm lens. Cropped detail (inset). 600 mm, 1/2000 sec, f/6.3, ISO 800
Does the Sony 200-600 mm work as a safari lens?
Of the 7,998 photos I took with the 200–600 mm shots in Kruger (excluding those taken with the 1.4x teleconverter, discussed below), 6,930 (87%) were at focal lengths from 404-600 mm. The extra reach over the 100–400 mm was definitely useful, and I used it a lot.
Although I was often shooting at the longer end of the zoom, there are often opportunities to photograph smaller animals, such as chameleons, mongooses, or tortoises, near the car. The 200–600 mm will focus as close as 2.4 m (8 ft), which was fine for those occasions.
Unfortunately, as you can see from some of the photos here, we had miserable weather through much of the trip. With a minimum aperture of f/5.6, switching to f/6.3 at about 300 mm, this isn’t a “fast” lens. The overcast conditions and regular heavy rain meant that I was often shooting at high ISOs (35% of my photos were taken at ISO 6400 or above), which does degrade image quality. Fact is though, you can’t get a faster lens for Sony in this focal range without paying serious money for it – retail price for the Sony 600 mm f/4 GM is US$12,998. Most people would prefer to just deal with slight image noise. (For the record, I’ve found Topaz DeNoise AI to work magic.)
I still think the 100–400 mm is better as a “do it all” lens on a Kruger safari. Mads was able to photograph larger animals next to the car, which did happen a few times, as well as general wide shots such as herds, and nice sunrises and sunsets. Ideally, though, you’d have two camera bodies anyway. Following this trip, I think my optimal setup would be the 200–600 mm and a second body matched with a wider and faster lens such as a 70–200 mm f/2.8 (or the upcoming Tamron 70–180 mm f/2.8).
Moar Reach: Using the 1.4x or 2.0x teleconverter
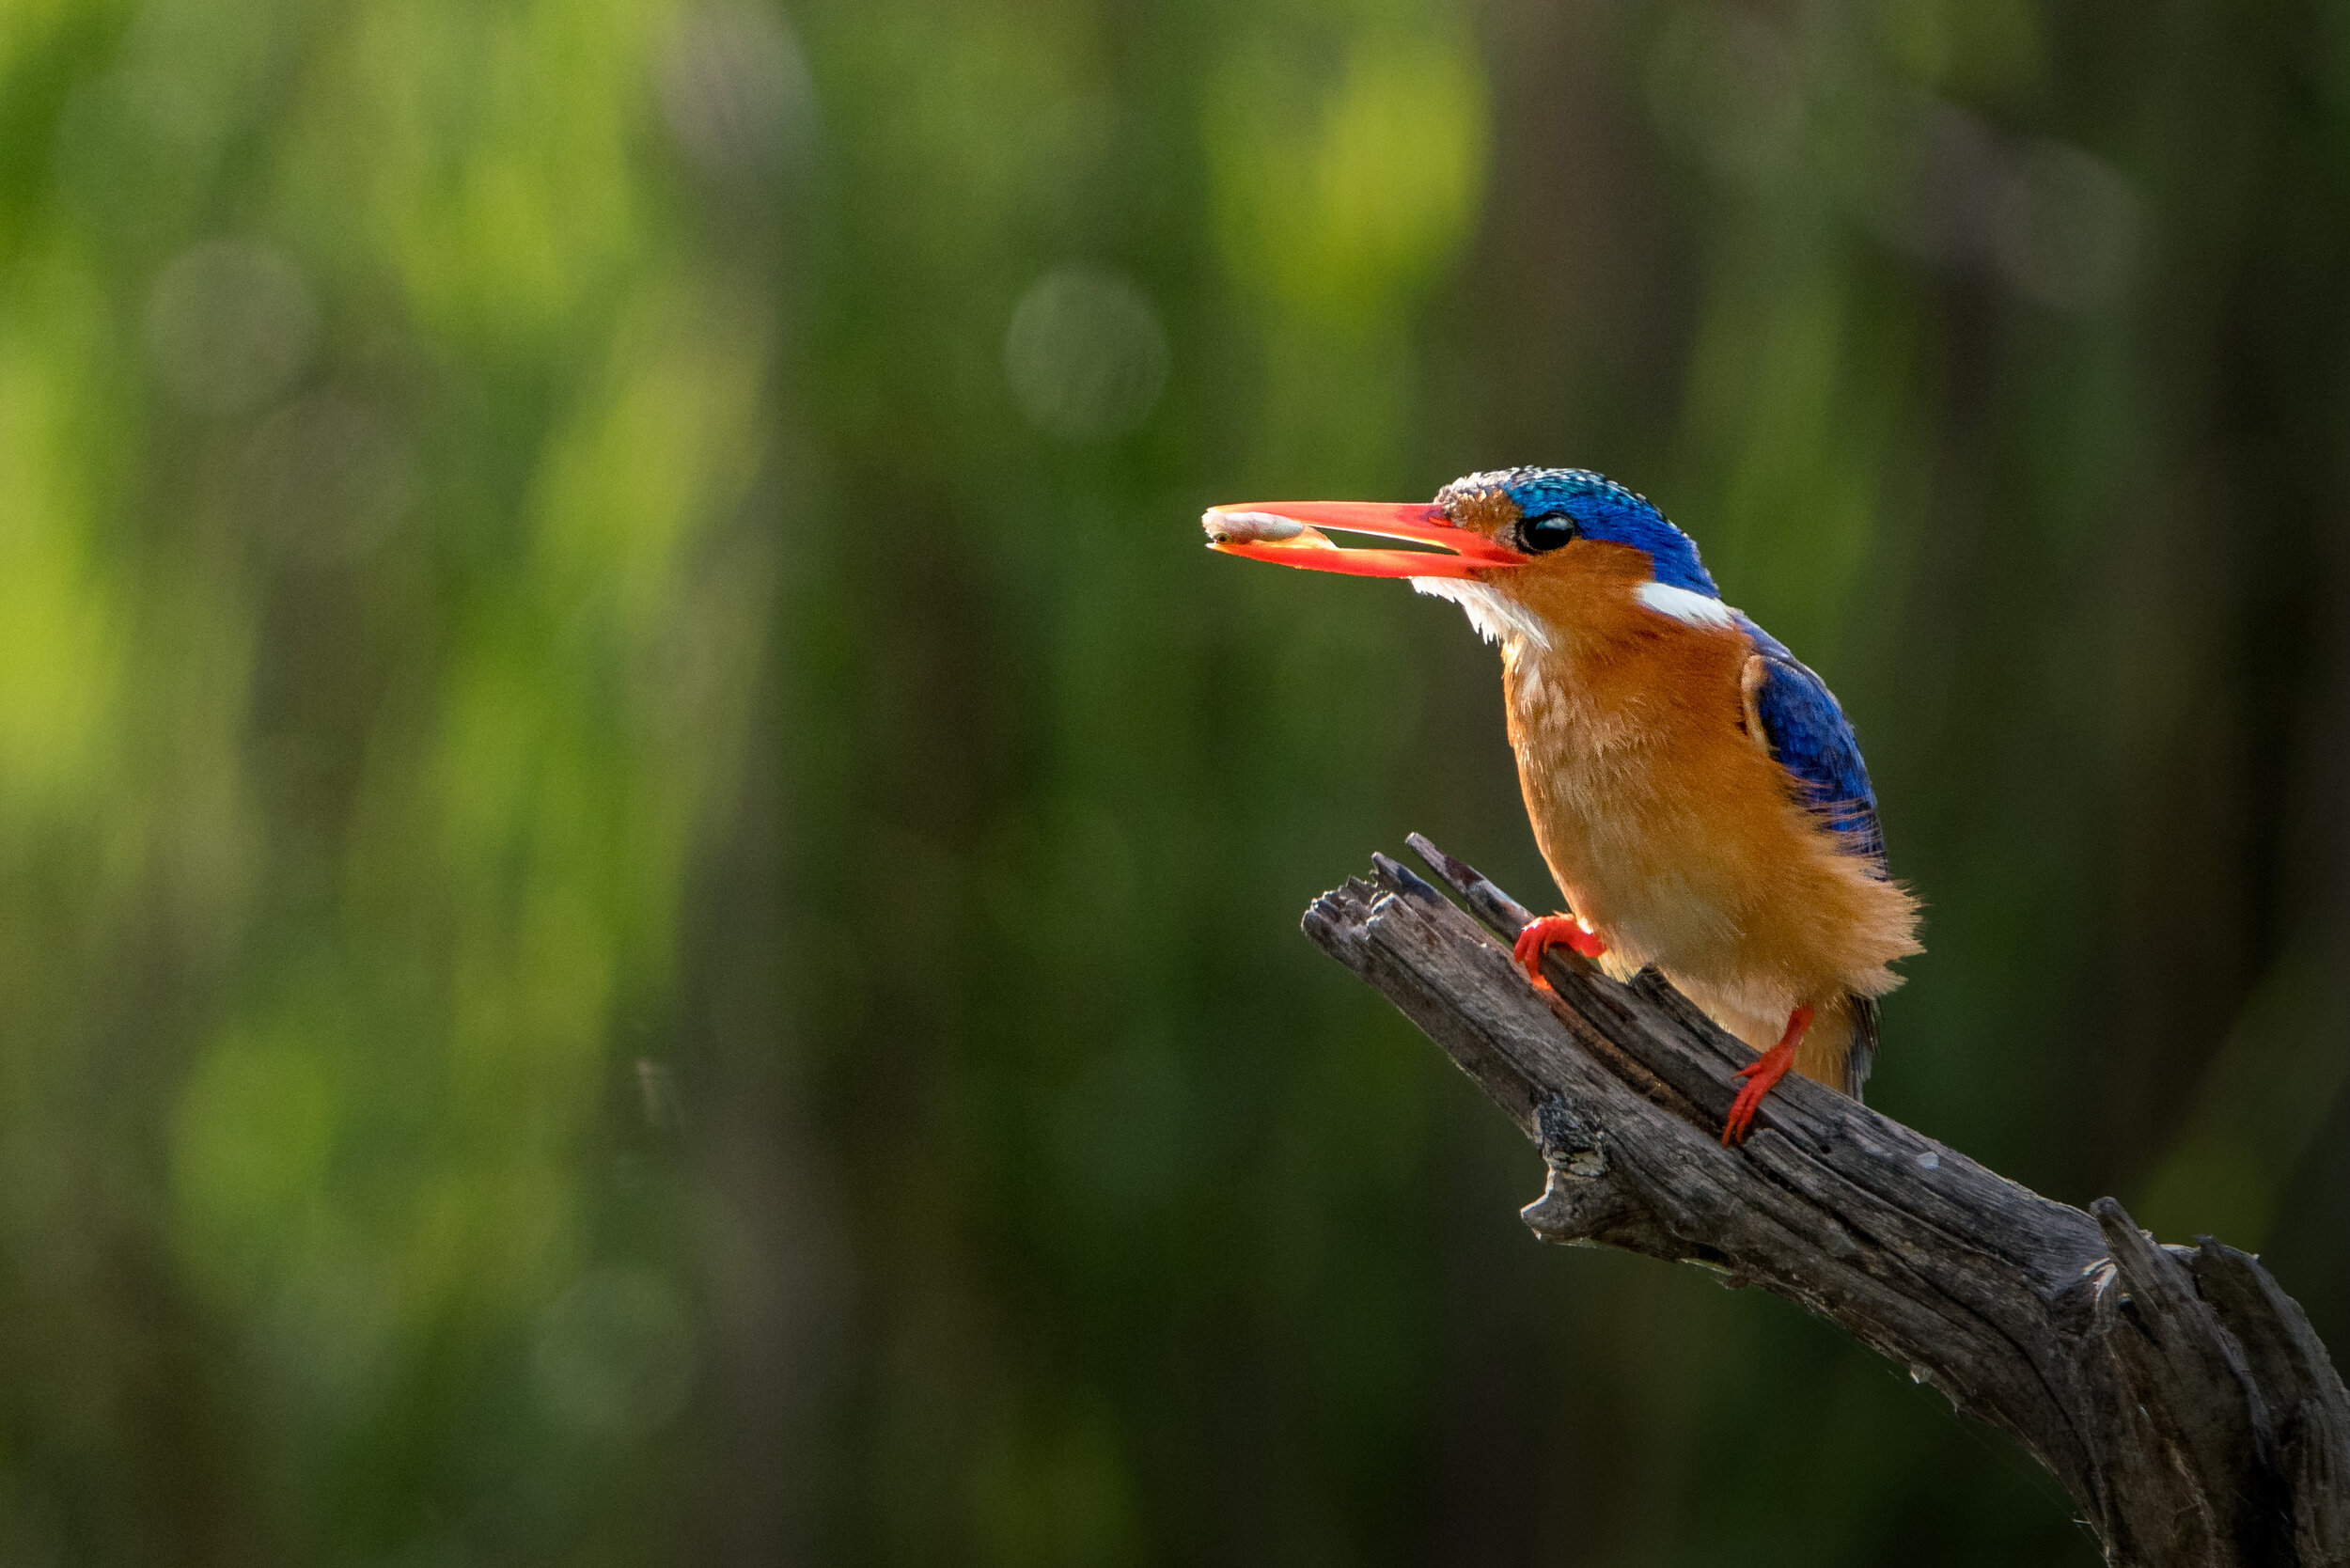
Malachite kingfisher. Shot with Sony 200-600mm lens with 1.4x teleconverter 832 mm, 1/1000 sec, f/9, ISO 1600
The 200–600 mm is the “longest” Sony zoom lens available, but you can extend its reach even further by adding a 1.4x or 2.0x teleconverter. I’ve got the 1.4x teleconverter, so I took the opportunity to use it for a few test shots while we were at the Lake Panic bird hide.
The results were quite good. Autofocus seemed okay with the teleconverter attached, although I was almost always using “Flexible Spot: Small” at those distances anyway. I would totally use it for distant subjects.
However, it’s very important to point out that the A7R III’s continuous autofocus has limitations at apertures over f/8. Above f/8, if you shoot a burst, the focus will stay locked at the initial focus distance. The f/6.3 aperture of the lens above 300 mm, plus the teleconverter, means that your working aperture is f/9. If you’re trying to capture birds in flight, or any animals that are moving towards or away from you, you’ll want to switch your drive mode to Single Shooting so you can keep the subject in focus.
Of course, you’ve got plenty of megapixels to play with on the 42.4 MP A7R III, and even more on the newer 61 MP A7R IV. A large-screen 4k TV or computer monitor is only equivalent to an 8 MP still image, so you’ve got plenty of pixels leftover if the image is destined for online use. For a quick in-camera “digital zoom” I’ve set my C2 button to manually switch to APS-C (1.5x crop) mode via the “APS-C S35 / Full Frm Sel.” function. That uses only the center area of the sensor, giving the appearance of a 900 mm lens (but producing an 18.8 MP image).
Why is that useful? Well, because the electronic viewfinder immediately magnifies your view to match. It can be easier to place the autofocus point exactly on the small eye of a bird, for instance. I try not to overuse APS-C mode, though, as it’s exactly the same as cropping an image during post-processing. It’s helpful to keep those extra pixels to help refine the composition. Still, though, it’s useful to know about.
Final thoughts: Will I buy the Sony 200-600 mm lens? Should YOU buy it?
Well, that’s the US$1,998 question, isn’t it? The answer is… yes.
Overall, I prefer the 100–400 mm as a walkaround lens. It’s much smaller and lighter, focuses much closer (98 cm), and – as above – I can still use APS-C mode to get to 600 mm (18.8 MP) at a push. But there are plenty of situations, such as working from a car in Kruger or from an expedition ship in the Arctic, where I can benefit from the extra reach while avoiding having to carry a heavier lens around for long periods. The 200–600 mm is still totally hand-holdable, it’s just more of an effort than the 100–400 mm. Importantly, we're about to start selling big, gorgeous, high-end metal wildlife prints now (yay for product plugs!), so the ability to get to 600 mm at full 42 MP resolution is – literally – valuable to me.
Which lens should you choose? Well, that depends. The 200–600 mm is actually cheaper than the 100–400 mm (which retails at US$2,498), so it’s fantastic value. You’ll want to consider several questions, though. How much will you be hand-holding, travelling with, or walking around with the lens? The 100–400 mm is significantly smaller and lighter. How often do you anticipate shooting at over 400 mm? If you’re likely to be shooting distant subjects on a regular basis, as we were doing in Kruger this trip, the 200–600 mm was fantastic.
Ultimately, the good news is that you can’t go wrong here. Both are great lenses. I hope you’ve found this comparison useful!
Simon.
Items mentioned